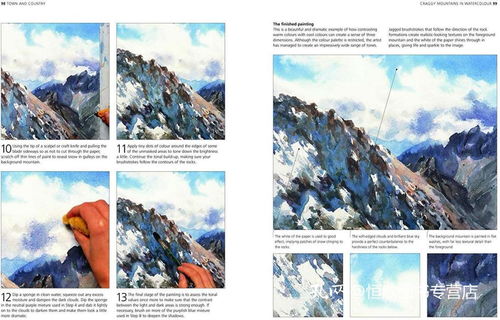
Content:
Fly fishing is an art form that has captivated anglers for centuries. The technique involves casting a lightweight fly rod to attract fish with artificial flies that mimic insects or other aquatic creatures. One of the fundamental skills in fly fishing is knowing how to tie a fly hook and float. In this article, we will delve into the ins and outs of this essential skill, ensuring you're well-equipped to master the art of fly fishing.

Introduction
Before we dive into the nitty-gritty of tying a fly hook and float, let's briefly discuss the importance of this skill. A well-tied fly rig can make all the difference between a successful day on the water and frustration. The right setup can ensure that your fly is presented correctly to the fish, increasing your chances of a successful catch. So, let's get started with the step-by-step guide on how to tie a fly hook and float.
Materials Needed
To tie a fly hook and float, you will need the following materials:
- Fly rod
- Fly line
- Leader material (usually monofilament or fluorocarbon)
- Fly hook
- Float (also known as a strike indicator)
- Nippers
- Scissors
- Fishing knots (e.g., the improved clinch knot, the albright knot, or the blood knot)
Step-by-Step Guide
Prepare your materials: Begin by gathering all the necessary materials and ensuring they are clean and untangled.
Cut the leader material: Measure and cut the desired length of leader material, typically between 9 to 12 feet long. This will provide enough length to reach the water's surface and maintain a natural presentation.
Attach the leader to the fly line: Choose one of the fishing knots mentioned earlier, such as the improved clinch knot or the albright knot, to attach the leader to the fly line. Make sure the knot is secure and double-check that the leader is correctly aligned with the fly line.
Attach the fly hook: Thread the fly hook through the eye of the float, ensuring it is positioned in the center. The hook should be perpendicular to the float, which will help in achieving a natural presentation.
Form the tippet: Cut a piece of monofilament or fluorocarbon material for the tippet, which is the length of line between the fly and the hook. The tippet length can vary depending on the fly you are using and the water conditions. Tie one end of the tippet to the bend of the fly hook using an improved clinch knot or a blood knot.
Attach the fly: Select the appropriate fly for your target species and thread it onto the tippet. Ensure the fly is securely attached to the tippet and positioned in the center.
Adjust the float: Once the fly and hook are attached, adjust the float to the desired height above the fly. This will depend on the water depth and the type of fly you are using. A higher float can indicate a more aggressive retrieve, while a lower float can simulate a more natural presentation.
Test the rig: Before casting, give the fly rig a gentle tug to ensure all components are secure. Test the float's position and make any necessary adjustments.
Cast and fish: With your fly rig ready, it's time to cast and fish. Pay attention to the water conditions and the behavior of the fish, adjusting your approach as needed.
Conclusion
Tying a fly hook and float is a crucial skill in fly fishing that can significantly impact your success on the water. By following the step-by-step guide provided in this article, you will be well on your way to mastering this essential technique. Remember, practice makes perfect, so don't be afraid to experiment and refine your fly rigging skills. Happy fishing!